The connection of a directory service to i-doit provides many advantages. Whether Active Directory, OpenLDAP or Novell Directory Services: Almost every common directory service is supported. Users, groups and computers are regularly imported and updated in i-doit through the connection via LDAP/LDAPS. Since we receive questions about Active Directory time and again, here we summarise the most important information and best-practice configurations for you.
What are the advantages of a connection?
If you maintain your AD anyway, the connection saves you from double maintenance of the master data. The more users you have in your AD, the more time you save.
In addition, groups can also be taken from your AD or mapped to groups in i-doit. This allows permissions to be granted based on AD group membership. If a user is assigned to a different group in AD, this also affects his or her permissions in i-doit. This is helpful, for example, when hiring new employees: By creating the new employee in the respective AD group, they automatically receive access to the information they need for their tasks.
Create LDAPS certificate
A certificate is required for the use of LDAPS. This must meet the requirements in order to be used for communication between i-doit and the AD server.
Depending on which certificates you are already using, the export differs here.
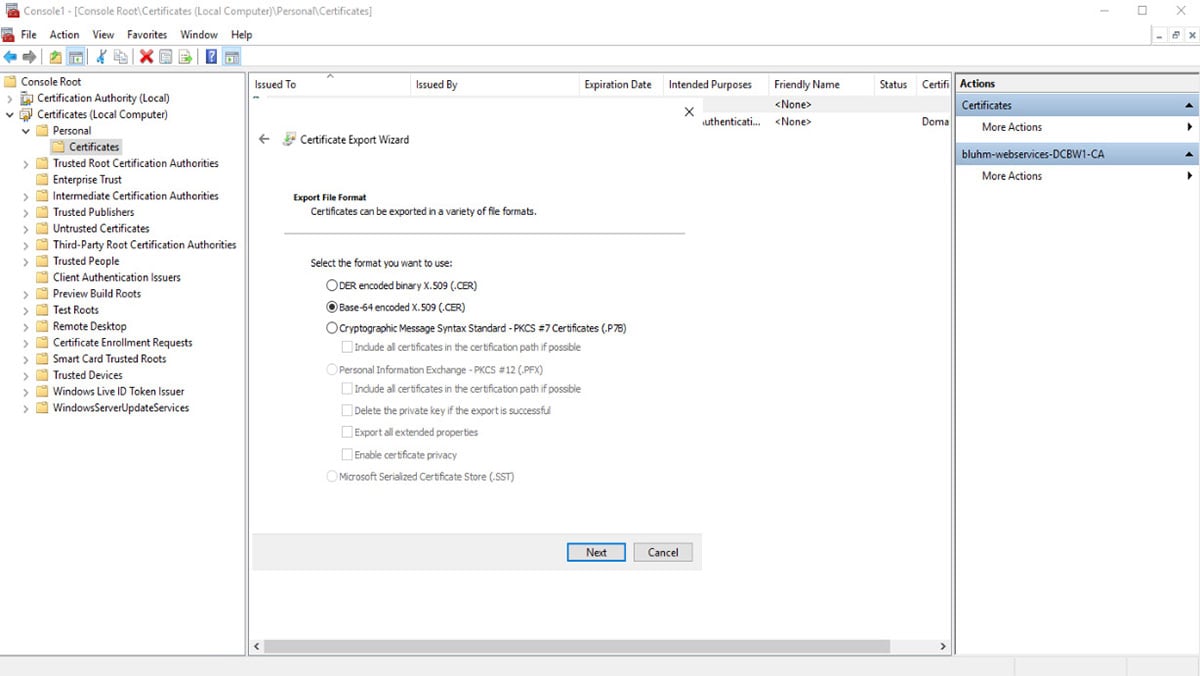
Certificate minimum requirements
SHA256, Version V3, Min 2048 Bits, Purpose Client / Server Authentication
Note: If you export the certificate “DER-encoded”, you must re-encode it, e.g. via openssl.
After the export, we need to upload the certificate to the i-doit server in the following directory.
/usr/local/share/ca-certificates
Install LDAPS Certificate
The certificate must now be changed from the file extension .cer to .crt. After the certificate has been uploaded, we need to update the certificate in the ca certificates.
update-ca-certificates
Test certificate
To test the certificate, you can use gnuTLS, for example. You can install this under Debian, for example, with the following command:
apt-get install gnutls-bin
Afterwards, it can be checked whether the certificate on port 636 is valid for the specified domain name (dcbw1.i-doit.com).
gnutls-cli –print-cert -p 636 –x509cafile /etc/ssl/certs/ca-certificates.crt dcbw1.i-doit.com
As a result, the certificate should be issued with a message:
– Status: The certificate is trusted.
– Successfully sent 0 certificate(s) to server.
– Description: (TLS1.2)-(ECDHE-SECP384R1)-(RSA-SHA256)-(AES-256-GCM)
– Session ID: 3A:4C:00:00:7E:DB:D4:D0:8E:AC:4B:E5:EA:14:4F:EA:71:8B:46:E1:49:65:8A:F5:A3:05:BD:43:0B:66:21:E8
– Options: extended master secret, safe renegotiation,
– Handshake was completed
Otherwise you will get an error message like this.
signed using RSA-SHA1 (broken!)
Status: The certificate is NOT trusted. The certificate chain uses insecure algorithm.
In this case, you must create a secure certificate that meets the requirements.
Testing LDAPS on Windows Server
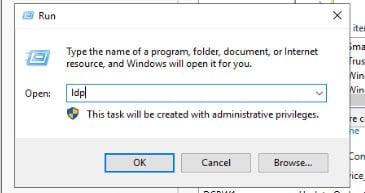
On the Windows server side, you can check whether connections are accepted. To do this, right-click on the Windows icon and then click on Run. Enter “LDP” to open the LDP tool.
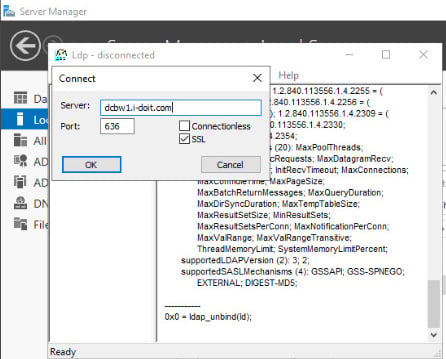
The DC on port 636 SSL is specified here as the server.
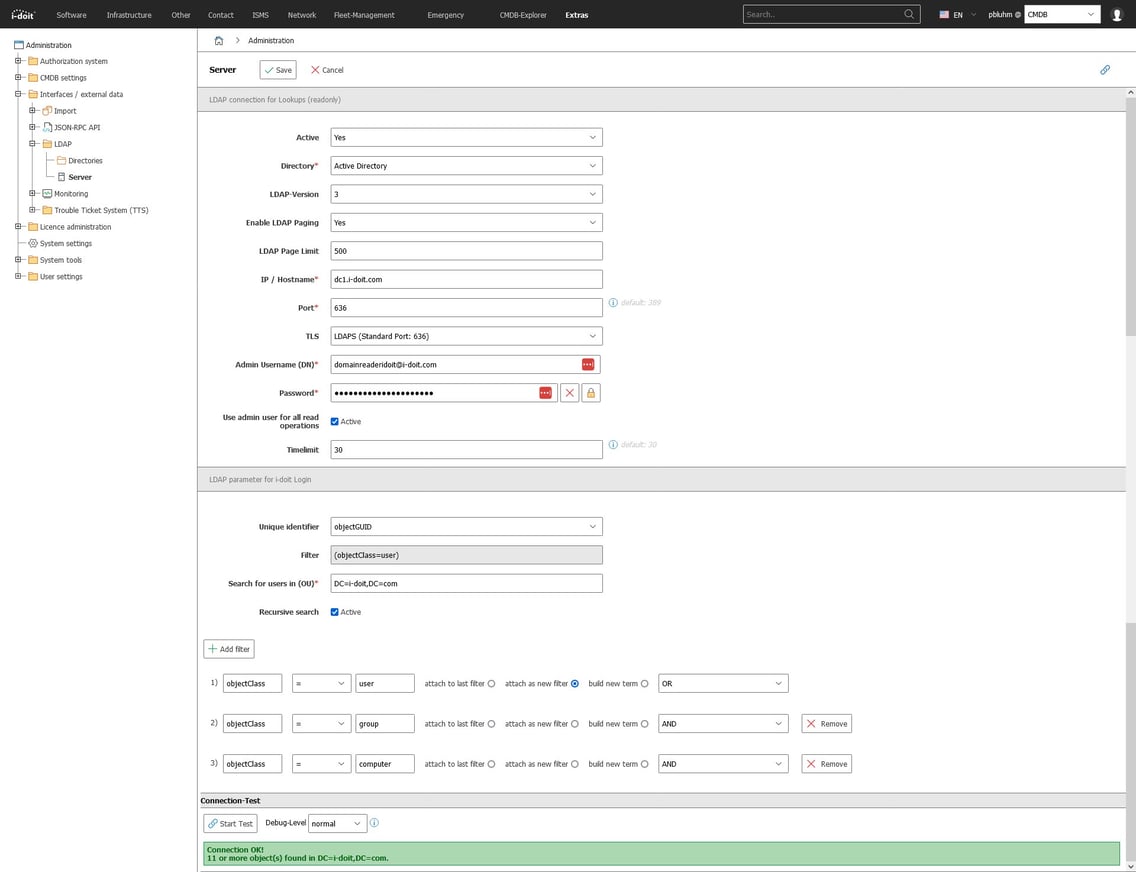
Testing LDAPS in the web interface
The LDAP server must be created under Administration -> Interface / External Data -> LDAP -> Server. Port 636 should be specified for LDAPS and “LDAPS” under TLS.
User and group filters
You do not always want to find all users and groups from the AD in i-doit. Often it is sufficient to select the users and explicitly specify the user groups, for example, or to filter by OU.
Various filters can be used for this purpose in the LDAP server configuration.
Example:Configure the groups via distinguishedName to specify them explicitly.

Create a separate user: ldapsync
For tracking changes, a separate user should be created via the web interface. This user will then be displayed as the user in the i-doit logbook for all changes. Especially when using several interfaces and automations, it should always be considered that the changes remain traceable. If the same user is used for all interfaces, it is difficult to determine the cause of errors that can occur.
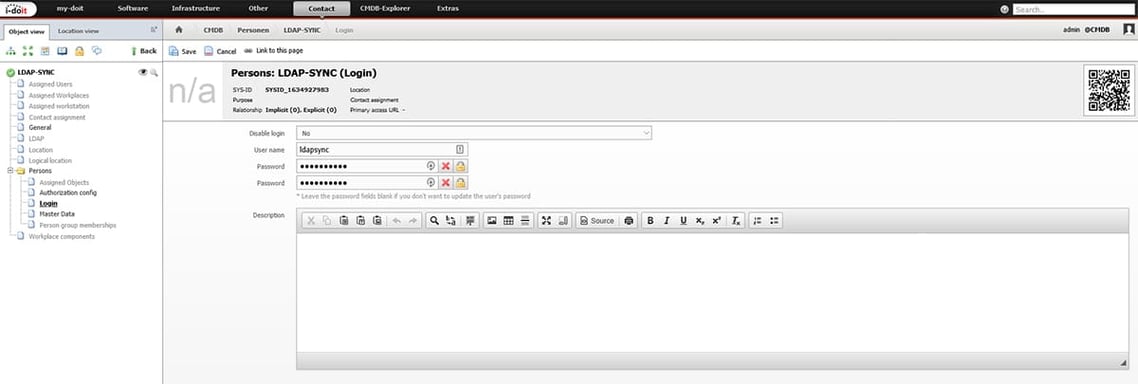
Via the web interface we create a new user and assign a password. In this example we call the user “ldapsync”.
This user does not have admin rights. It will only have the authorisation to execute the SyncCommand under Administration -> Authorisation system -> Rights -> Administration.

We have to enter this user data later in the upper part of the configuration files so that it is used during sync.

The changes are then clearly visible in the i-doit logbook. Everything that is changed via the LDAP interface is assigned to the “ldapsync” user.

Up to 8 additional attribute fields can be addressed and imported from the AD via the category extensions.
Create configuration file
On the shell, navigate to the installation directory of i-doit. This is usually located under /var/www/html/. Here we navigate to the directory:
/src/handler/config/
Important:
When the .ini file is created in the i-doit folder, this code must be added in the .htaccess file. It is also possible to place the .ini file outside the web directory.
## Deny access to all ini files…
<Files "*.ini">
Require all denied
</Files>
Now we create a new configuration file with the name ldap-sync.ini.
nano /var/www/html/src/handler/config/ldap-sync.ini
Our configuration file should have the appropriate parameters to map the attributes from the AD.
[commandArguments]
[commandOptions]
user=ldapsync
password=password123
tenantId=1
[additional]
import_rooms=true
defaultCompany=“
deletedUsersBehaviour=disable_login
disabledUsersBehaviour=disable_login
; LDAP Attributes are individual. This default configuration is prepared for Active Directory:
attributes[department]=department
attributes[phone_company]=telephoneNumber
attributes[phone_home]=homephone
attributes[phone_mobile]=mobile
attributes[fax]=facsimileTelephoneNumber
attributes[description]=info
attributes[personnel_number]=initials
attributes[organization]=company
attributes[street]=streetAddress
attributes[city]=city
attributes[zip_code]=postalCode
attributes[function]=title
attributes[service_designation]=title
;category extension for persons
attributes[custom_1]=objectSid
attributes[custom_2]=sn
attributes[custom_3]=homePhone
attributes[custom_4]=mobile
attributes[custom_5]=info
attributes[custom_6]=manager
attributes[custom_7]=physicaldeliveryofficename
attributes[custom_8]=company
autoReactivateUsers=false
ignoreUsersWithAttributes[]=“sn“
ignoreUsersWithAttributes[]=“givenName“
syncEmptyAttributes=true
ignoreFunction=empty
If you use a ldap-sync.ini for the import as described above, you must define the attributes there accordingly. Set the following entries in ldap-sync.ini:
attributes[custom_7]=physicaldeliveryofficename attributes[custom_8]=company
Now we have to execute the LDAP-sync so that the new attributes are transferred. We can do this on the CLI via the Console.
/usr/bin/php /var/www/html/console.php ldap-sync –config /var/www/html/src/handler/config/ldap-sync.ini
or without configuration file:
/usr/bin/php /var/www/html/console.php ldap-sync –user ldapsync –password password123 –tenantId 1 –ldapServerId 1
Map security groups from AD to groups of persons in i-doit
In addition to the pure import of users and groups, security groups from the AD can also be mapped to groups of people in i-doit. There can be very different use cases for this, e.g.
- The IT administrators of the IT department should also automatically receive corresponding authorisation in i-doit.
- A certain department should have read-only access to i-doit.
For this use case, we will map the employees from accounting into the group “reader” from i-doit.
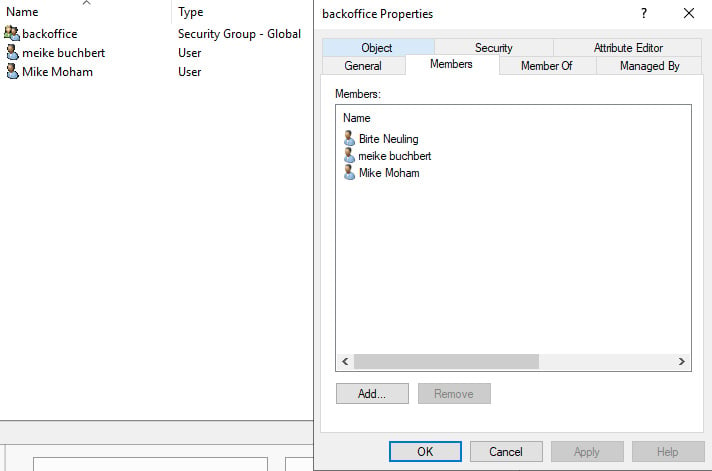
In our OU “Backoffice” there are 2 users and a security group for the back office. This group also includes “Birte Neuling”, who works in sales but often takes on tasks in the back office.
We will now map this security group to the “reader” group in i-doit.
To do this, we change to the person group and go to the master data. Here we find the field LDAP group (mapping) in which we now enter the name of the group from the AD. Instead of the name, the objectSID of the group can also be used.

After the LDAP-sync has been executed, the users are added to the specified groups. This gives you the permissions of the people group in i-doit.

Map people to locations
A somewhat complicated matter is to map people to locations. For example, the company building or a certain room could be interesting as a location. With a little programming work, you could put together an array via the i-doit API. This first creates all user data and then writes to the location.
However, it can also be done much more simply and without any programming knowledge.
Let’s proceed here in a structured way. First of all, it must be identified in which attribute field the future location was entered with the users. This can be, for example, the attribute “office” or “company”.
Important:DThe location name must be identical to the object names in i-doit. Do you want the user to be automatically assigned to your room “EG-002” later? Then the entry in the AD must be exactly the same as the object title in i-doit.
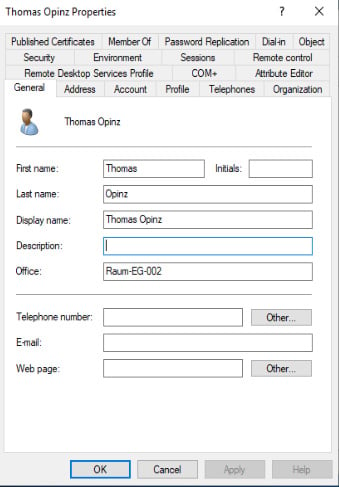
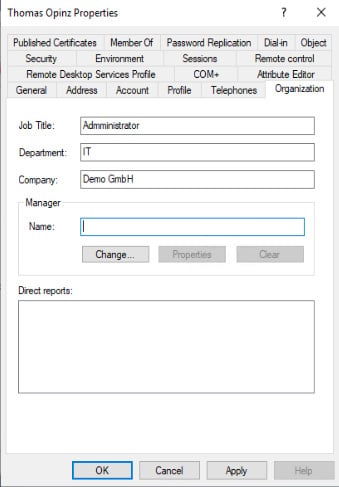
For a room specification, the field “Office” is usually used.
|
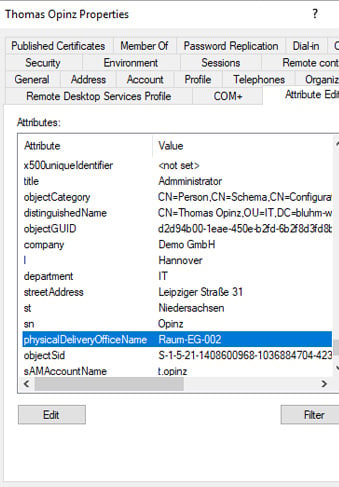
This is managed as attribute “physicalDeliveryofficeName” in the AD.
|
For the assignment to a company/organisation, the attribute “company/company” is often used.
|
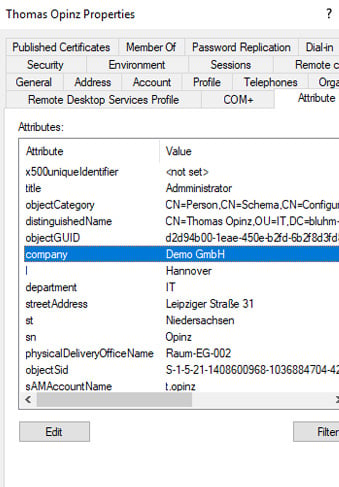
This is listed in the AD as “company”.
|
We enter these attribute values in the ldapsync.ini or in the administration under CMDB Settings -> Category Extensions in fields 7 and 8. This way, the corresponding attributes are taken over from the AD during the next ldap-sync.
Important: By using an INI configuration file, the category extensions from the web interface are not used.
Create a report
The data from the AD is now in the CMDB. Here, it can now be processed further in an automated way. We would now like to achieve that the user location in the master data in the field Custom_7 is transferred to the category “Location”. If you have not yet activated this, open the “Quick Configuration Wizard” under Administration -> CMDB Settings and activate the category “Location” for the object type “Persons”.
Note: You could of course use the same principle to assign a workstation to a user, to specify a logical location or to assign a device to the user.
We now switch to the Report Manager and create a new category for automations. Via this category, we can later control which groups of people/users should have access to it via the rights system.
 “Normal” users should not be given access to the reports to prevent careless changes. Permissions can be granted or revoked for users or groups.
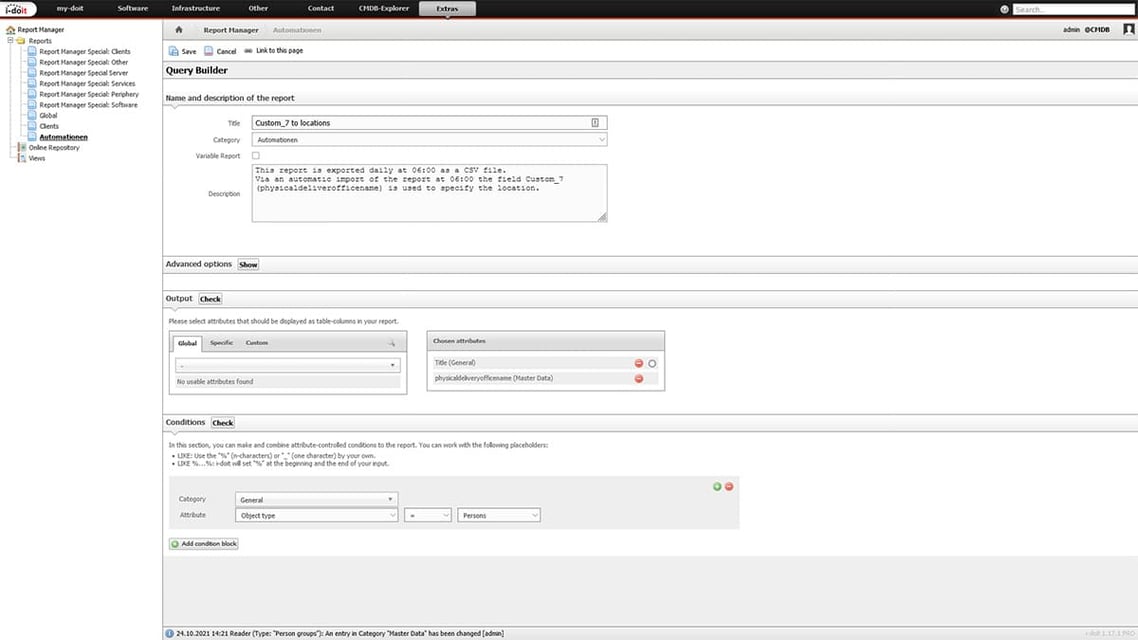
In this category we now create a new report. This report should provide us with the object title and the “physicaldeliveryofficename” from the master data as outputs. As a condition, we specify that only objects of the type “persons” are to be an output.
Export report as CSV file
We now want to export this report regularly. There is also a function on the console that does this work for us.
Important:
When the .ini file is created in the i-doit folder, this code must be added in the .htaccess file. It is also possible to place the .ini file outside the web directory.
## Deny access to all ini files…
<Files "*.ini">
Require all denied
</Files>
We create a new INI file via the CLI.
sudo nano /var/www/html/src/handler/config/isys_handler_report-export.ini
Here we have to specify the access data just like in the ldap-sync.ini. In addition, we must also specify which report is to be exported.
[commandArguments]
[commandOptions]
user = ldapsync
password = password123
tenantId = 1
reportId = 55
exportPath = /var/www/html/automation
exportFilename = personenstandorte
exportFileType = csv
In this configuration, the user “ldapsync” is used again, consequently the entries in the logbook are again kept with this user. In order for this user to also be allowed to use the “report-export” function, we must again give him separate authorisation. This time for the command “ReportExportCommand”.
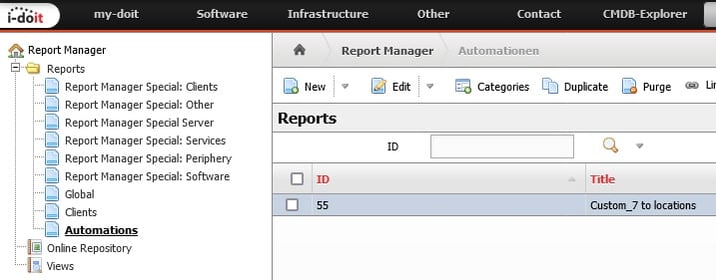
The report ID can be found in the overview page of the respective report category. This ID must be specified together with the export path in the configuration file.
Last but not least, we also create a cron job for this task. This is to be executed daily at 6am.
Create cronjob:
sudo nano /etc/cron.d/automationen
Configure Cronjob:
* 6 * * * www-data /usr/bin/php /var/www/html/console.php report-export –config /var/www/html/src/handler/config/isys_handler_report-export.ini >/dev/null 2>&1
Now the report is exported daily at 06:00 into the directory /var/www/html/automation as person-locations.csv.
Almost done! Now the data just needs to be imported regularly to update the location of the users.
Update locations
Now the automatic import of this CSV file follows to update the users’ locations. In the first step we have to create a CSV import profile. The easiest way to do this is to download the created CSV file and upload it again under Tools -> CMDB -> Import -> CSV Import.
Here we set the Global Object Type to “People” and map the columns according to the desired attribute fields. In this example we want to set the location to “Rooms”.
Important: We must now save this selection as a profile. You can also perform an import to test whether the profile configuration is correct.
After we have saved the profile, we switch to the CLI to find out the profile ID.
sudo -u www-data /usr/bin/php /var/www/html/console.php import-csvprofiles -u admin -p password456
All profiles incl. the ID are then displayed.
List of profiles:
1: Mobile (mobile.csv)
2: Server (server.csv)
3: Clients (clients.csv)
4: locationspersons (locationspersons.csv)
We now create a new configuration file for the CSV import.
sudo nano /var/www/html/src/handler/config/userlocations-import.ini
Important:
When the .ini file is created in the i-doit folder, this code must be added in the .htaccess file. It is also possible to place the .ini file outside the web directory.
## Deny access to all ini files…
<Files "*.ini">
Require all denied
</Files>
Here we again specify the user, the path to the CSV file and the CSV profile to be applied.
[commandArguments]
[commandOptions]
user = ldapsync
password = password123
tenantId = 1
importProfileId = 4
csvSeparator = „;“
multiValueMode = column
importFile = /var/www/html/automation/userlocations.csv
[additional]
Again, we need a cronjob to trigger this function automatically.
sudo nano /etc/cron.d/automationen
This job is to be carried out with a slight time delay at 06:30 a.m. daily.
30 6 * * * www-data /usr/bin/php /var/www/html/console.php import-csv –config /var/www/html/src/handler/config/userlocations-import.ini >/dev/null 2>&1
Automatic assignment completed
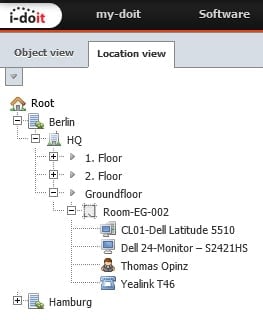
The users are now automatically assigned to the locations that are managed in the AD. When calling up the location view, it is now possible to see which people are in a room directly when it is opened.
Let’s take a look at the entire process. At 05:00 in the morning, a cron job is triggered that establishes a connection to the AD server and performs a comparison with the existing users and groups according to the server configuration. In the process, the category extensions (e.g. physicaldeliveryofficename) are also completed with the desired attributes from the AD. The report available in the Report Manager is automatically updated with the transferred values.
At 06:00 the next cronjob is executed, which exports the report as a CSV file.
06:30 The last cronjob is triggered, which imports the exported report via a CSV profile. Now the users’ locations are updated and the process is completed.

Why was 1 hour left between the AD import (05:00) and the second cronjob for the report export? Does the import process take that long?
The import is highly dependent on the existing/used infrastructure. Normally, the process takes about 1 – 2 minutes for approx. 2500 persons and groups. However, if servers are requested via remote VPN networks or the network is heavily loaded, e.g. because backups are being carried out in parallel, this can take longer.
Recommendation: Make a test run and check how long the import actually takes. You should still allow some buffer time in case the network is subject to workload peaks.
Do you have any questions or suggestions?
We hope you enjoyed this little guide to LDAP integration with i-doit. If you have any questions or suggestions, please do not hesitate to contact us.
.png?width=708&height=350&name=i-doit_Logo_(ohne_claim).png)

