The goal of a CMDB is to store data centrally and make it available for all users. But there are cases where not all users should have access to all information. This applies to the employees of your own company as well as to external service providers. In our current use case, we will create different groups of people and give them different rights depending on their field of activity.
i-doit offers extensive configuration options
This enables you to grant separate rights to each user. This way, the user only has access to the functions and information he needs for his daily work.
Groups can also be created for departments or employees with the same primary task. In this way the administration effort is kept as low as possible.
In principle, an administrator has full access to all settings, functions and add-ons. If several administrators are assigned to manage the system, it can be useful to restrict this access to certain areas, devices or add-ons.
Administration without full access
Our employee “Paula Oktal” is exclusively responsible for the administration of networks. Access to accounting information or passwords is not necessary in her area of responsibility. Therefore, we block these categories for her to minimise security risks. We create a new group of people called “Network Engineers” . We now add the user “Paula Oktal” to this group. The next step is to define the permissions for this group.
We configure the “Network Engineers” group so that its members do not receive accounting and password information. The rights for these categories are not granted for them. In the administration area we open the menu item Rights System -> Assign Rights -> CMDB. There we select our created group and load the rights.
First we assign the default rights. This allows i-doit to be used as usual. In the last step we adjust the rights for categories by removing “Accounting” and “Passwords”.

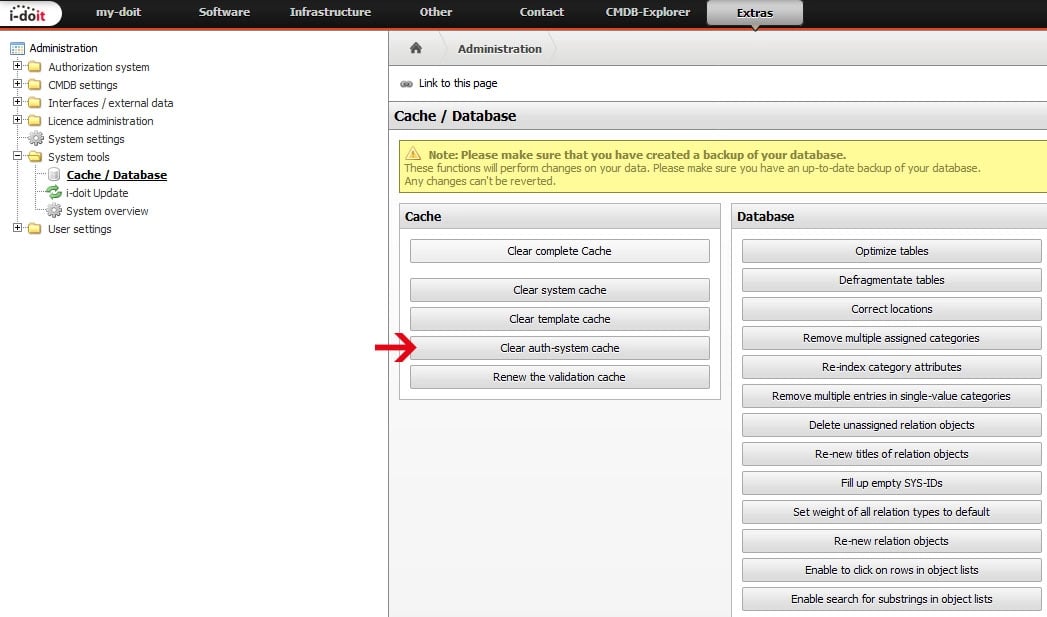
We then empty the rights system cache so that the changes take effect. This is easily done in the administration area, under System Tools -> Cache/Database, in the left navigation menu, by clicking the button “Empty right system cache”.
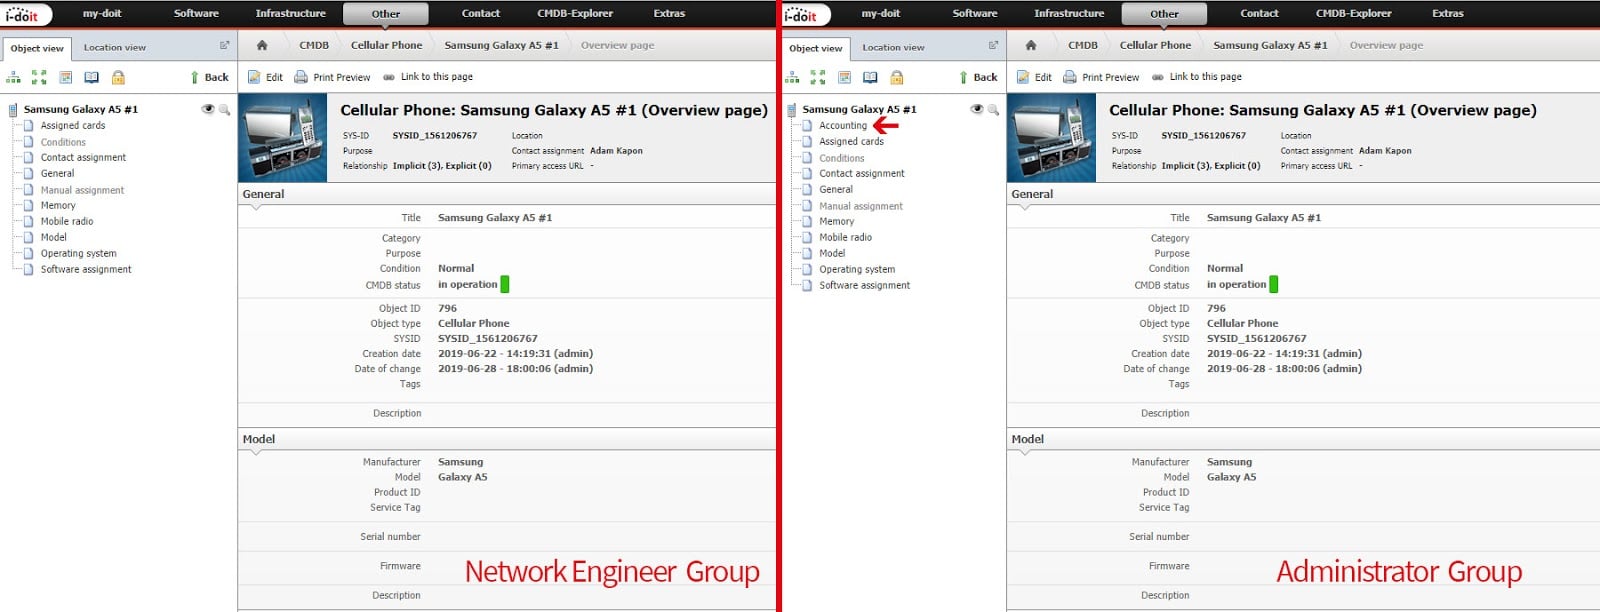
The direct comparison now shows that the “Accounting” category is no longer available to users of the “Network Engineer” group. Administrators and groups with appropriate permission can still view and edit it.

Authorisations by location
We would like to further restrict the permissions of our “Network Engineer” group. Our company has a total of nine offices worldwide, but our employees should not be able to make changes in the other international locations. So we have to limit access and change the rights to Germany.
Back in the rights system, we select our group again and create two new rules. Firstly, we specify that users have access to the objects below the defined location. And secondly, of course, they should also be allowed to open the categories to be able to query the information.

Block access to racks and critical systems for unauthorised personnel
Server racks and the servers, storage systems and devices they contain, usually form the core of the IT infrastructure. To ensure a high level of IT security, information about critical systems should only be accessible to authorised persons. These rights can also be specifically assigned or restricted.
Controlling access in projects
For projects where sensitive customer data is collected, we can adjust access rights accordingly to make the information only available to selected project members and clients. We then release certain information to external employees and service providers without giving them access to the entire project. Depending on their access rights, these persons can then view the information or actively participate in shaping or adding and creating information.
Assigning and withdrawing rights
Our user “Paula Oktal” will now support a new infrastructure project. Since she also needs access to the passwords and data of the accounting department, we are assigning her to the user group “Administrators”. After the project is finished, we remove her from the “Administrators” group again, so that she is downgraded back to her original rights.

In order for these restrictions to take effect in the object browser, the location view and the CMDB explorer, we have to configure i-doit accordingly. To do this, we go to the settings under, Administration → System Settings → Expert Settings, and scroll down to the end of the list. There we have the possibility to add new entries.
We add three more entries here to activate access to areas only with permission.

Activation of add-ons for individual users
In addition to the numerous basic functions, i-doit can also be functionally extended with many add-ons. However, it does not always make sense to make these available to all users. Therefore we regulate access via group rights again. If a single user is to have access to one of the add-ons, we can assign him the right separately, without having to make changes to his assigned group. To do this, we open the rights assignment and add, for example, the room plan add-on.
Physical separation through client add-on
If you want to physically separate data of your customers or locations, we recommend the “Client” add-on. Here the existing data is stored completely separately and each client has their own user and rights system.
The rights system that leaves nothing to be desired
i-doit’s extensive rights system allows us to configure the authorisation of users and groups individually.
Typical fields of application are:
- Locking object types and categories for users and groups
- Short-term granting or withdrawal of additional rights for employees
- Control access to functions, information and add-ons
- Protection of information against unauthorised access
- Organisation of the documentation of project teams
Use i-doit’s rights system for uncomplicated and targeted user administration and thus increase the security of your IT.
Further information on the rights system can be found in the knowledge base.
If you have further questions about i-doit, please contact the sales department sales@i-doit.com or use our contact form.


